| Table of Contents | ||||||||||
|---|---|---|---|---|---|---|---|---|---|---|
|
Overview
The XTRF Platform offers you several automations for Smart projects. By using those automations you can preconfigure and unify your projects, avoid repeating actions, and make project management as frictionless as possible. Smart automations can be managed on three levels:
Global level - in
 Configuration menu > Projects and Quotes > Automations (Smart). The automations configured there will be applied to all new Smart projects and quotes.
Process level - in Process Templates Designer. The automations configured there will be applied to all Smart projects and quotes that use the specific process template.
Project level - in the project’s Process, Jobs, and Finance cards. The automations configured there will be applied only to the current project.
This article describes the global level automations from the ![]() Configuration menu > Projects and Quotes > Automations (Smart).
Configuration menu > Projects and Quotes > Automations (Smart).
At the top of the Automations for Smart Projects and Quotes page, you can check the results of using automations on the Home Portal.
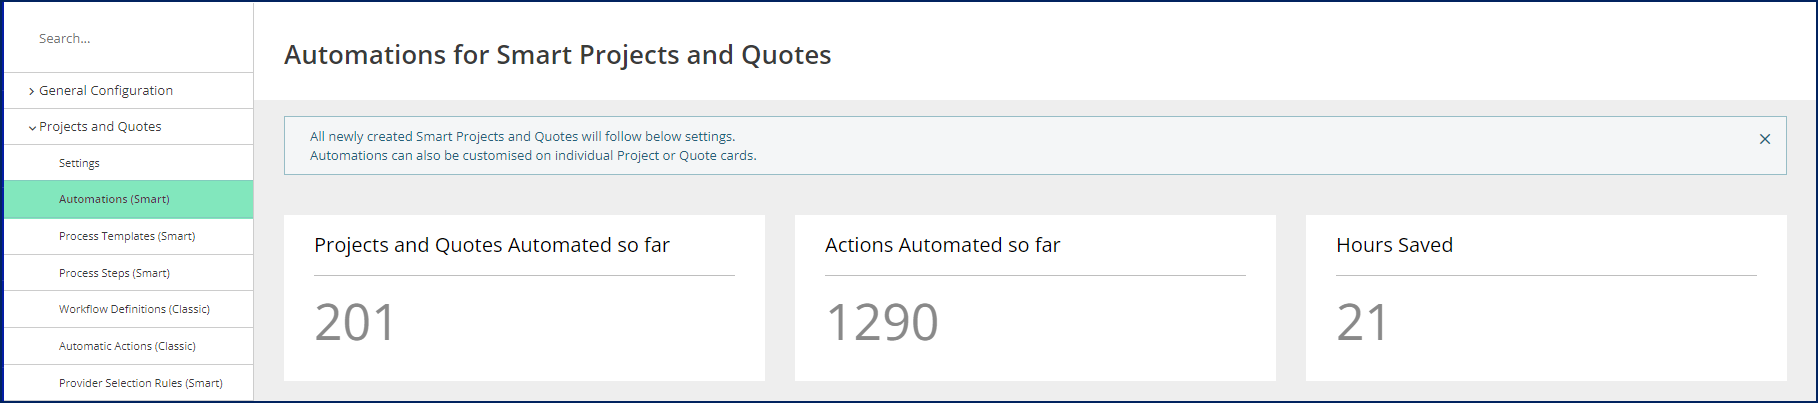
Scroll down to see the automations settings.
Automatic CAT Project Creating
This automation is exclusively configured in the Process Template Designer (see the Projects and Quotes - Process Template Designer article).

Automatic Job Dates
This automation calculates jobs' planned start dates and deadlines in Smart projects and quotes. The calculations are based on the Volume provided in the Order/Quote card and the selected vendor’s productivity (see the Vendor profile - Competencies & Rates tab - Price Profile section, step 10).
If no vendors are assigned to jobs, the dates will be calculated based on the default productivity set for each job type (see the System Values: Advanced - Job Types - Add a job type, step 10).
If productivity isn’t defined for the selected vendor and job type, theminimum job duration will be applied.
For the first job in the project, the planned start date and time will be the same as the project creation date. If the project is created outside working hours, the planned start date of the first job would be set to the next working day.
This automation schedules jobs within the time frame defined by default vendor availability hours and vendor's availability during weekends (see the Clients and Vendors - Vendor Settings - Availability tab article). If you do not wish the automation to schedule deadlines for weekends, make sure to have Treat Weekends (Sat-Sun) as Work Days for Vendors option unchecked.
To activate the automation, toggle the On/Off switch in the top right-hand corner of the automation card.

| Info |
|---|
Job and project dates can always be changed manually by the PM. Manual changes in dates cancel the automation, and no further changes in the project’s Volume will affect the job scheduling. |
Configure the automatic job dates per project
If you want to enable or disable the automation or provide a different minimum job duration only for a specific project, perform the following steps:
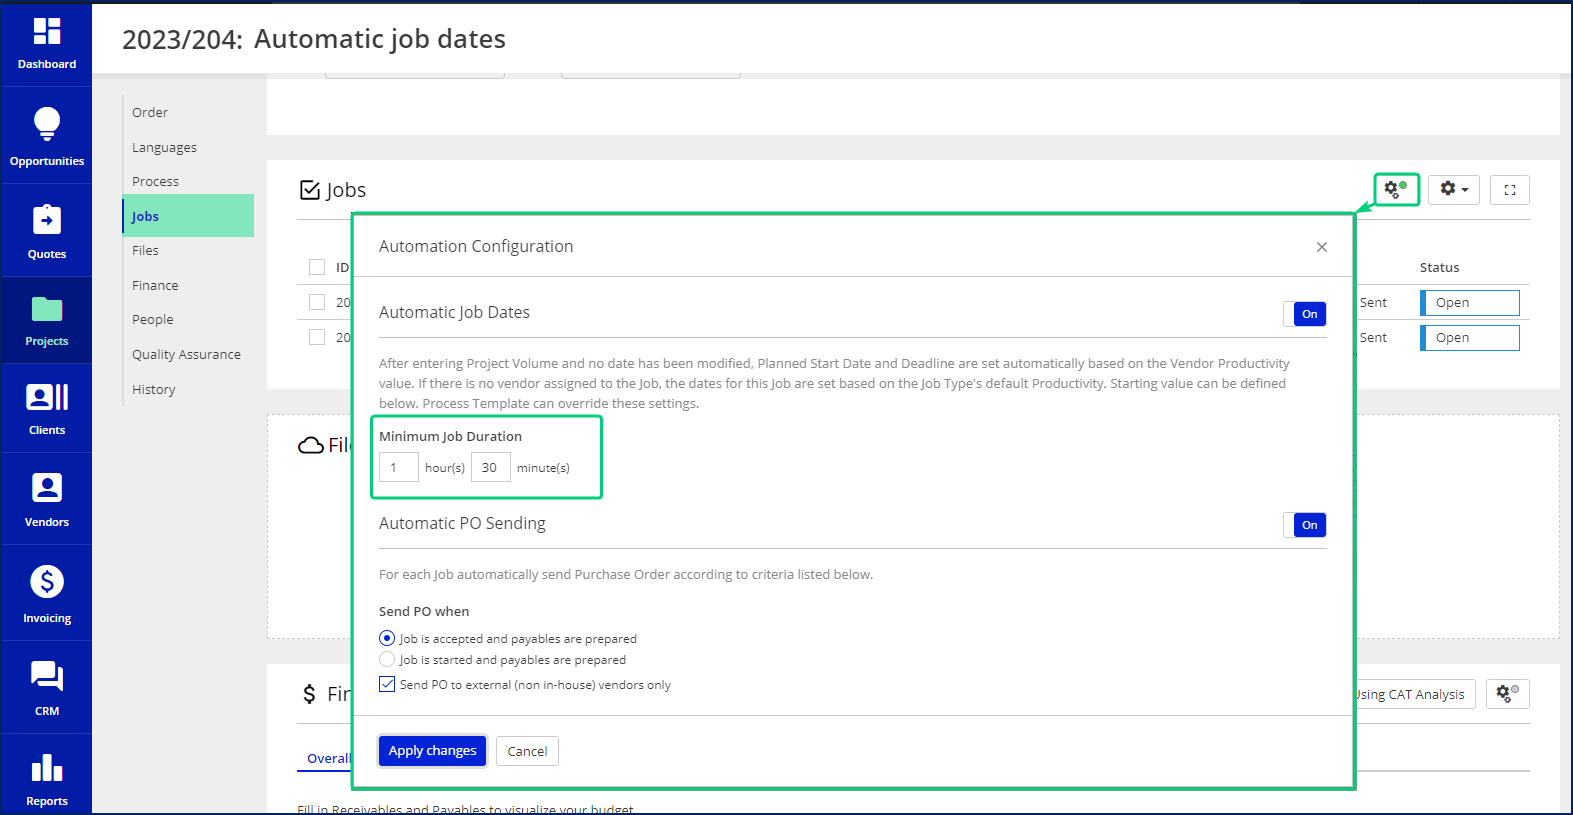
Open the project in question.
Go to the Jobs card.
Click the
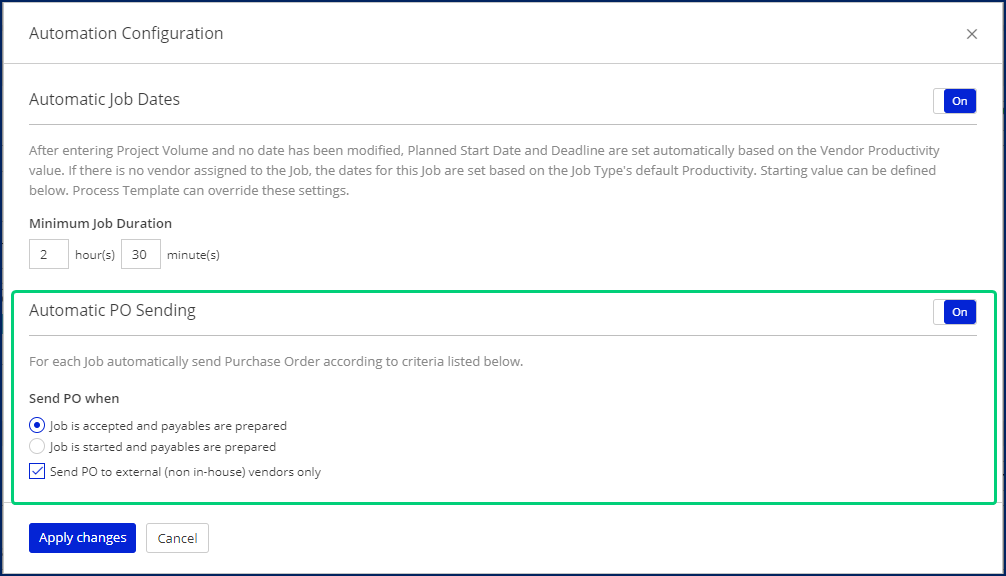
button.In the Automation Configuration pop-up:
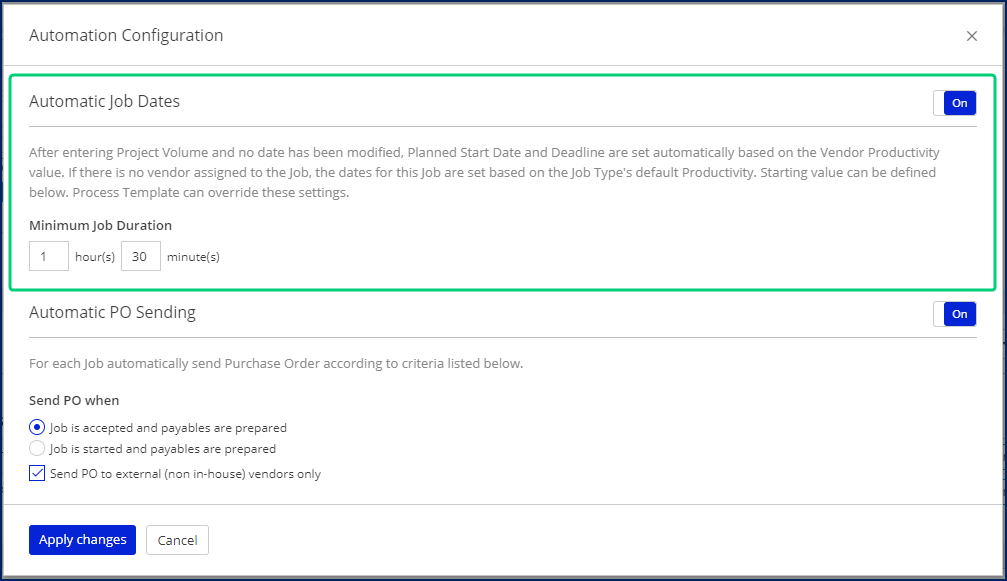
Switch the Automatic Job Dates On or Off using the top right-hand corner switch.
(Optional) Adjust the Minimum Job Duration value.
Click the Apply changes button.
The changes in the job dates in the current project will be displayed immediately.
Set a minimum duration for jobs
We recommend setting a minimum job duration if you are using Automatic Job Dates. Otherwise, this automation may cause an error in projects with a small volume: it will try to set the job’s deadline date the same as the start date.
| Info |
|---|
The minimum job duration set in the Automatic Job Dates card or the Automation Configuration pop-up will be the lowest possible job duration, even when the project's volume is set to 0. If you change the project’s volume so the job duration will exceed the minimum, the job's deadline will be adjusted accordingly. |
You can set a minimum job duration on three levels:
For all job types in all new Smart projects - directly in the Automatic Job Dates card in the
Configuration menu > Projects and Quotes > Automations (Smart).

For all jobs in a specific project - in the Automation Configuration pop-up in the Jobs card of the desired project.
For a specific job in a specific project - in the process template. This setting will override the minimum job duration from the Automatic Job Dates card.
To configure this setting, perform the following steps:Open the Smart project in question.
Go to the Process card.
Click the Edit Process button to open the Process Designer.
Click on the step in question.
In the job configuration side panel on the right, scroll down to the Scheduling section.
Select the Define specific Minimum Job Duration option and provide the desired duration.
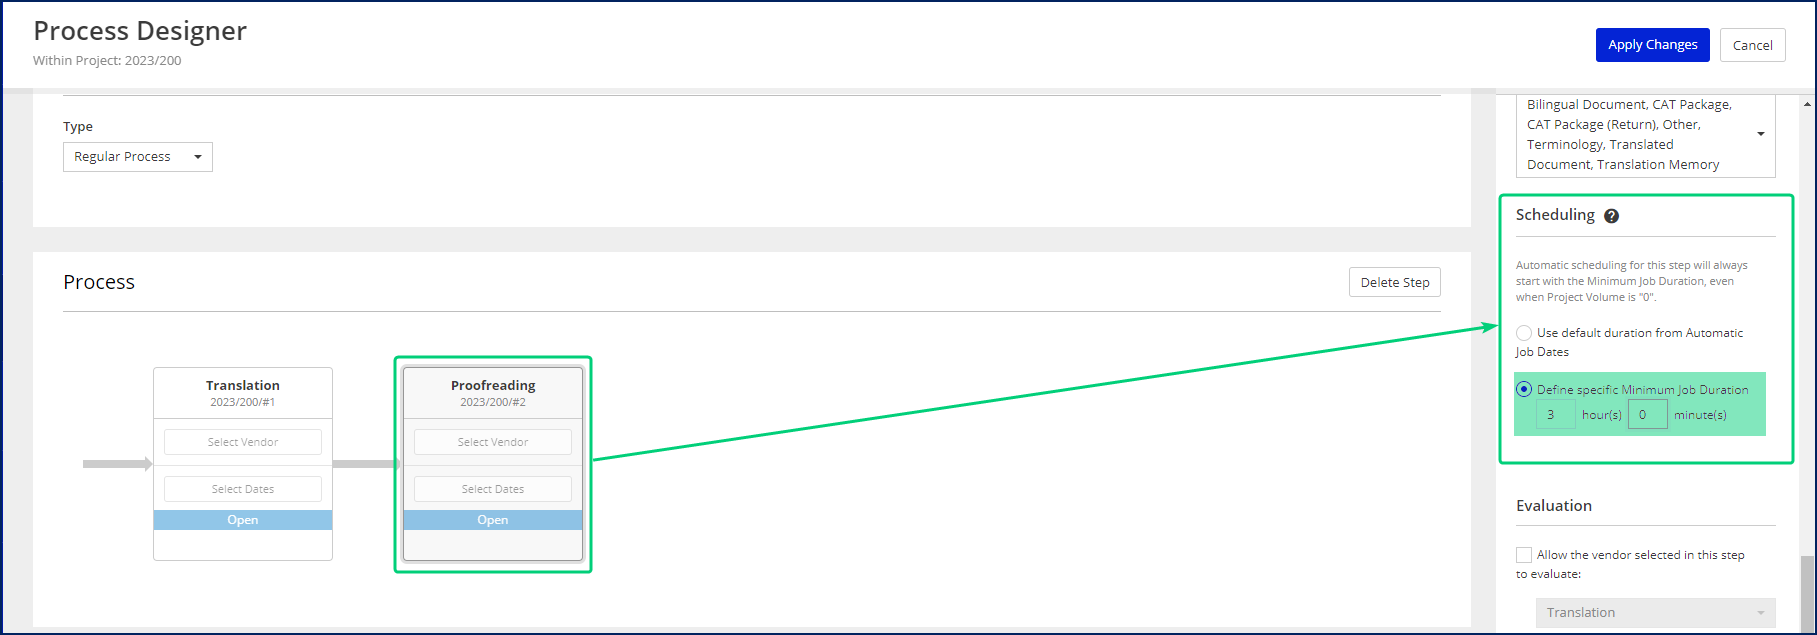
Click the Apply Changes button in the top right-hand corner.
Automatic Jobs Splitting
This automation creates separate jobs for each target language added to the project.

To activate the automation, toggle the On/Off switch in the top right-hand corner of the automation card.
From the Step Types for which Jobs will be automatically split drop-down list, select the steps that should have split jobs.
Automatic Vendor Assignments
This automation is exclusively configured in the Process Template Designer.

Automatic People Assignments
This automation assigns a project manager to projects and quotes depending on the selected service.
| Info |
|---|
This automation is permanently enabled. |

To change the assigned person, select another assigning rule (Logged-in User or Assign PM from Client profile) or a particular Home Portal user from the Project Manager drop-down list.
To change the assigned person for a specific service, click the Add Service button in the top right-hand corner of the automation card. The Add Service pop-up window appears.
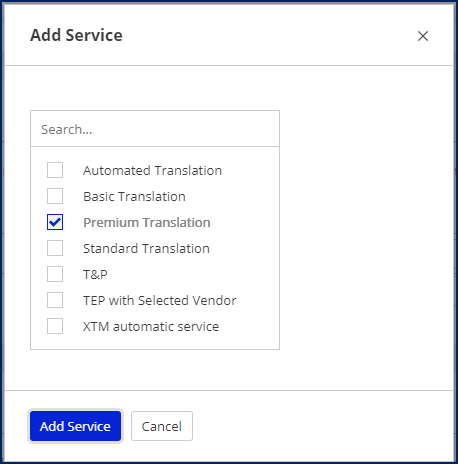
Check the boxes for the selected service(s).
Click the Add Service button. The new service appears in the Service list.

Select the desired rule or user from the Project Manager drop-down list.
To delete the assignment for a specific service, click the
icon.
Automatic CAT Analyses
| Info |
|---|
The automation works only for projects with a memoQ-integrated process and starts after creating the linked project in memoQ. |
This automation adds CAT analyses for each language combination used in the project. Every time you upload one or several work files and related bilingual documents are imported from memoQ new CAT analyses are also imported. When you add another file for the already used language, a new CAT analysis file for this language is created. You can choose which CAT analysis file - the first or the last - should be used in financial calculations on the project level or in the Automatic Receivables and Automatic Payables automation settings.
| Info |
|---|
For more information about memoQ-integrated projects, see the memoQ section of the Knowlegde base. |

To activate the automation, toggle the On/Off switch in the top right-hand corner of the automation card.
To enable or disable the automation for a specific service, click the Add Service button in the top right-hand corner of the automation card. The Add Service pop-up window appears.
Check the boxes for the selected service(s).
Click the Add Service button. The new service(s) appear in the Service list.

Switch the toggles in the Default State column according to your needs.
The analyses are imported only after the file importing process is finished.
Automatic Files Delivery
This automation sends the clients an e-mail with a link to the ZIP package of ready files. You can configure which files should be delivered and when.

To activate the automation, toggle the On/Off switch in the top right-hand corner of the automation card.
In the When files should be delivered section, select one or several actions that will trigger the delivery.
From the Which files from the last job(s) in process should be delivered drop-down list, select the types of files you want to deliver to clients and click the Done button.
| Info |
|---|
The e-mail sent within this automation is based on the E-mail/Text Message to Client: When files are delivered in Smart Projecttemplate. To edit this template, go to the |
To learn how to configure this automation per project, see the section about File Actions in Smart projects - Files card article.
Automatic Receivables
This automation adds one receivable for each language combination in a project.

To activate the automation, toggle the On/Off switch in the top right-hand corner of the automation card.
To enable or disable the automation for a specific service, click the Add Service button in the top right-hand corner of the automation card. The Add Service pop-up window appears.
Check the boxes for the selected service(s).
Click the Add Service button. The new service(s) appear in the Service list.

Switch the toggles in the Default State column according to your needs.
To configure the settings of a specific service-related receivable, click the
icon. The Edit Automatic Receivable pop-up window appears.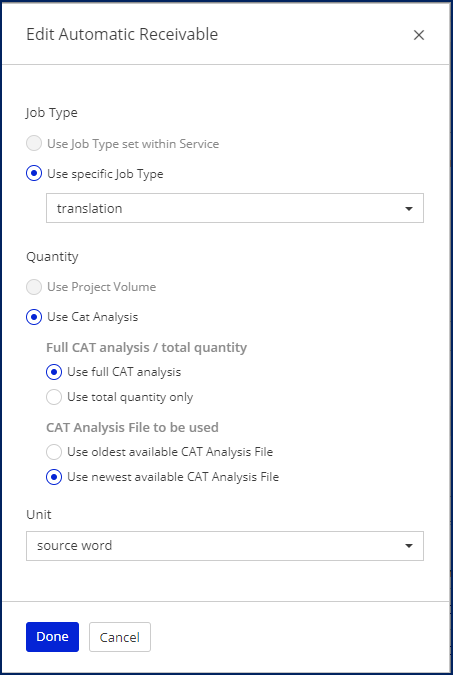
In the Job Type section, select the desired job type from the Use specific Job Type drop-down list.
In the Quantity section:
Decide whether the receivable should only be based on the full CAT analysis or the total quantity.
Decide which CAT analysis file should be used - the oldest or the newest.
Select a calculation Unit.
Click the Done button.
| Info |
|---|
The Use Job Type set within Service and Use Project Volume options are not active yet. |
You can edit automatically created receivables n the Receivables tab.
Automatic Payables
This automation adds one payable for each language combination in each job within a project.

To activate the automation, toggle the On/Off switch in the top right-hand corner of the automation card.
To enable or disable the automation for a specific service, click the Add Service button in the top right-hand corner of the automation card. The Add Service pop-up window appears.
Check the boxes for the selected service(s).
Click the Add Service button. The new service(s) appear in the Service list.

Switch the toggles in the Default State column according to your needs.
To configure the settings of a specific service-related payable, click the
icon. The Edit Automatic Payable pop-up window appears.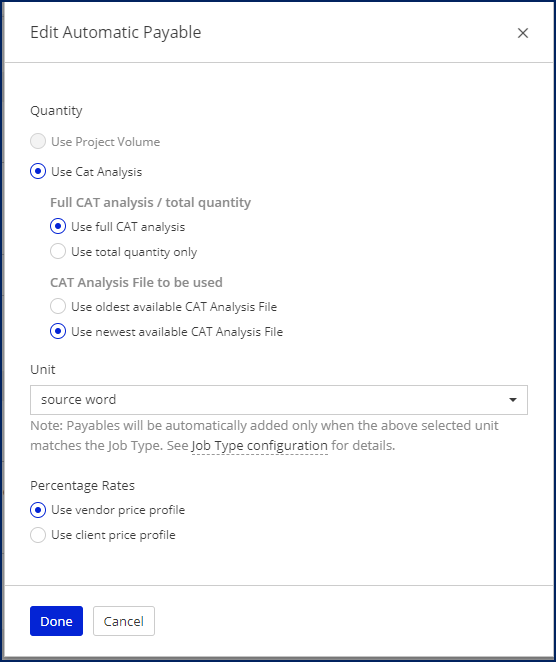
In the Quantity section:
Decide whether the payable should only be based on the full CAT analysis or the total quantity.
Decide which CAT analysis file should be used - the oldest or the newest.
Select a calculation Unit that matches the units assigned to a job type (see the System Values: Advanced - Job Types article).
In the Percentage Rates section, decide whether the rates should be taken from the vendor’s or client’s price profile.
Click the Done button.
| Info |
|---|
The Use Project Volume option is not active yet. |
You can edit automatically created payables in the Payables tab.
Automatic PO Sending
This automation sends the vendors an e-mail with a purchase order (PO). The PO is sent after the payable is ready and the job gets the correct status.

To activate the automation, toggle the On/Off switch in the top right-hand corner of the automation card.
In the Send PO When section, select the job’s status that will trigger the sending:
When the job is accepted, and payables are prepared
When the job is started, and payables are prepared.
Uncheck the Send PO to external (non-in-house) vendors only to send the purchase order to all vendors.
| Info |
|---|
The e-mail sent within this automation is based on the When purchase order for jobs is sent to vendor in Smart Project template. To edit this template, go to the |
Configure the automatic PO sending per project
If you want to enable or disable the automation or select different settings only for a specific project, perform the following steps:
Open the project in question.
Go to the Jobs card.
Click the
button.In the Automation Configuration pop-up:
Switch the Automatic PO Sending On or Off using the top right-hand corner switch.
Select the job’s status that will trigger the sending.
Decide whether you want to send purchase orders only to external vendors.
Click the Apply changes button.
Automatic Quote Approval
This automation converts quotes to projects after the client approves the quote.
Clients can approve Smart quotes either on the Client Portal (if enabled) or on the Decide on Quote page that appears after clicking the Decide on Quote link in the automatic e-mail notification. When the Automatic Quote Approval is switched on, the client's approval will change the Smart quote's status to Approved and convert the quote into a project. Respective e-mail notifications will be sent to the client and project manager. All files and data entered in the quote will be transferred to the project.

To activate the automation, toggle the On/Off switch in the top right-hand corner of the automation card.
Configure the Automatic Quote Approval per quote
If you want to enable or disable the automation only for specific quotes, perform the following steps:
Open the quote in question.
Go to the Quote card.
Click the
button.In the Automation Configuration pop-up, switch the Automatic Quote Approval On or Off.
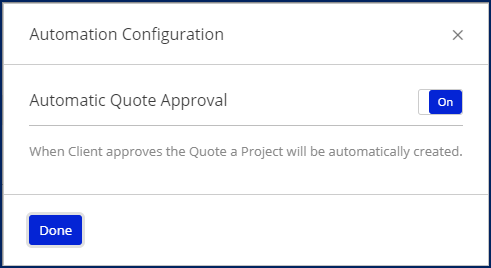
Click the Done button.
Automatic Document Delivery in CAT Tool
This automation is exclusively configured in the Process Template Designer.

Automatic Job Starting
This automation is exclusively configured in the Process Template Designer.

Automatic CAT Job Finishing
| Info |
|---|
The automation works only for projects with a memoQ-integrated process. |
| Info |
|---|
This automation is permanently enabled. |
This automation sets the Ready status for CAT tool-linked jobs after the vendor finishes their work in the CAT tool. The automation checks the status of the documents in the CAT tool. When all the documents assigned to a specific step receive the Finished status, the corresponding jobs in XTRF are marked as Ready, and the next job gets the Started status (if the appropriate auto-starting strategy is selected. To learn more about job auto-starting strategies, see the Process Template Designer section below).

| Note |
|---|
This automation can’t be applied to:
|
Project managers can manually switch job statuses regardless of this automation. However, we advise against changing the status to Ready while a vendor still works on the job.
The document delivery can also be automated (see the Automatic Document Delivery in CAT Tool section above).
| Easy heading | ||||||||||||||||||||||||||||||||||||||||||||||||||||||||||||||||||||||||||||||||||||||||||||||
|---|---|---|---|---|---|---|---|---|---|---|---|---|---|---|---|---|---|---|---|---|---|---|---|---|---|---|---|---|---|---|---|---|---|---|---|---|---|---|---|---|---|---|---|---|---|---|---|---|---|---|---|---|---|---|---|---|---|---|---|---|---|---|---|---|---|---|---|---|---|---|---|---|---|---|---|---|---|---|---|---|---|---|---|---|---|---|---|---|---|---|---|---|---|---|
|